Camera
Camera
The camera allows you to set 'eyes' in your project. With the camera you can control and explore different lightning effects and view your project from different angles in a fully controlled way. The camera views can be called up in a split view configuration on your screen.. 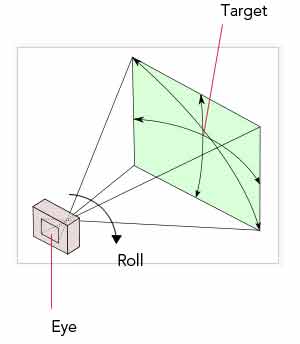
More about the camera
The camera is set in the Cameras and section manager located in the left side of your screen. You can open the cameras and section manager by clicking on the following icon:

Steps:
To initiate the menu click the icon as shown above.
Now the click the following tab:
To set a new camera, select the "+" character on the left.
Position
The camera's position is determined by the eye and the target. To set these coordinates you can enter values in the X, Y or Z fields. You can also use the icons to set the required parameters by selecting a eye or target position in your project view.
|
|
This icon will set the eye position |
|
|
This symbol will set the target by dragging in modelling mode. By default is disabled. |


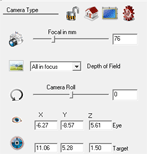
Camera Type
This lets you control the camera as in brand specific or lens specific settings. Using this option will allow you to overlap the picture in the background and to calculate the DoF with the same circle of confusion of the specific camera settings selected.
|
|
This option will lock your camera setting. |
|
|
|
|
|
Frame output lets you control the resolution and size of the output |
|
|
General settings let you match your view with common camera types |


Cone Angles
This option lets you narrow or broaden the camera focus.
|
|
This icon will invoke the Horizontal, Vertical and focal settings. |

DoF Parameters
|
|
Changes the Depth of Field Settings |

Camera roll
|
|
Here you will be able to control a rotation of the camera in degrees |

|
|