Shear Image
Home > 25 Raster Support > Shear Image
Shear Image
This command enables you to shear an image. This command has varied uses and includes for example, transforming rectangular tiles to diamond shaped tiles. The image frame is modified according to the change in angle and a background color is added.
\imgedit shear@
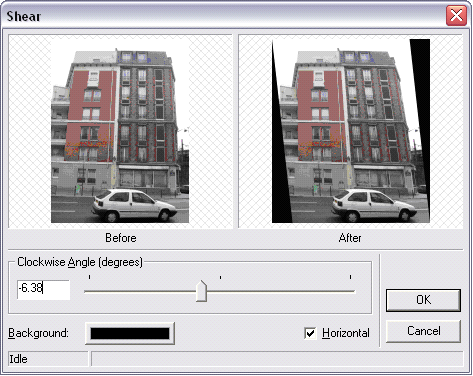
The system asks you to indicate an image to be modified. After you confirm your choice of image, ARC+ opens a dialog box that helps you control and view the modification:

This dialog box contains two "Before-After" windows for a dynamic preview of the angle change. You can control the shearing of the image by using the potentiometer (the default value is zero = center) or by entering a numerical value between -45 and 45 (degrees). For a positive value (between 0 and 45), the slant is in the clockwise direction and for a negative value (between 0 and -45) the slant is anticlockwise.
When you activate the Horizontal option, the shearing of the image is done on a horizontal plane (it will thus be distorted in the horizontal direction) :
When you deactivate this option, the shearing of the image is done on a vertical plane (it will thus be distorted in the vertical direction) :

Click the Background button to set the background color of the sheared image. To obtain a transparent background, select the same color as that of your work screen or clip the color margins using the Power Clip command.
Click Ok to modify the image or click Cancel to cancel the modification and exit the dialog box.
Before applying the modification, the system asks you to indicate a modification setting: apply the change only to the selected image (frame) or to the indicated image (frame) and all its copies.
