Customized Toolbars
Home > 01 Getting Started > Customized Toolbars
Customized Toolbars
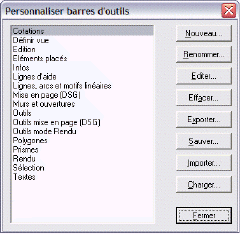
You can customize the toolbars by changing their contents or creating new ones. To run this command, right click on any toolbar and select Customize… in the menu that appears. The following dialogue box will appear:

The main part of this dialog box is a list of toolbars which can be customized. In this dialog box, you can:
Create new toolbar
Rename a toolbar
Edit contents of a toolbar
Delete a toolbar
Save the complete toolbar configuration
Import/Export a toolbar configuration in a file
Create or rename a toolbar
Click on the New… or Rename… button
Enter the new name in the dialogue box that appears
Click OK
Delete a toolbar
Select the toolbar from the list
Click Delete…
Confirm deletion
Edit contents of a toolbar
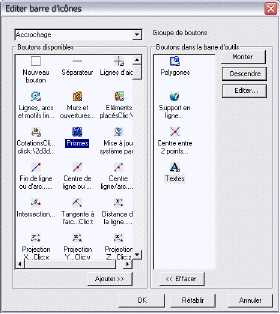
Click on the name of the toolbar to be edited, and then click Edit... Following dialog box will appear:

This dialog box has two parts:
On the left, you can see the list of icons available as per the command groups that you can select with the help of a pull-down list at the top on left. The currently used icons from the toolbar being edited appear on the right.
With the help of this dialogue box, you can:
Move an icon up/down
In the list on the right, the icons appear in the same order as that in the toolbar. You can change this order by selecting an icon from the list and then clicking the following buttons: Up or Down
Add an existing icon
To add an existing icon, select one from the list on the left and click Add >>. It will be inserted just before the one selected in the list on the right.
Add Separator
To add a separator, Click on the Separator button . It will be inserted just before the selected button in the toolbar on the right.
Create a new button
To create a new button, Click New button . It will be inserted just before the selected button in the toolbar on the right
Delete an icon
To delete an icon from the Buttons in the toolbar, select it and click << remove.
Edit button definition
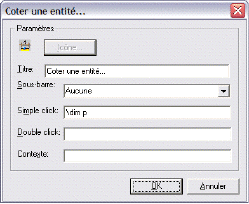
To edit the definition of a button, select that icon from the list on the right and click the Edit… button. The following dialog box will appear:
With the help of this dialogue box, you can:

Set button icon
Click the Icon… button to open the dialogue box where you can select the icon image file.
Define button title
You can enter the button name in Title field. This name will also be displayed in the small tooltip that appears as you take the mouse on the icon.
The simple click action
In the Single Click, field, you can enter the command sequence that the system will execute on a single click on the button.
Define optional parameters
The following parameters are not necessary for the definition of a new button:
PARAMETERDESCRIPTION
|
PARAMETER |
DESCRIPTION |
|
Sub-toolbar |
By selecting the name of a toolbar in this pull-down list, you can access it by keeping the mouse button clicked on this button |
|
Double click |
If required, you can enter the command sequence that the system should execute when you double click this button. |
|
Context |
If you enter a name in this field, every subsequent click on this button will lead to definition of a new work context. A context saves and replaces automatically the current position and display of all the toolbars. |
IMPORTANT: The image used for the icon should be saved in BMP format, 256 colors, and with the dimensions of 16x16 pixels.
NOTE: The command sequence can be composed of one or more names of ARC+ macro commands and/or parameters separated by spaces. You can also use the; symbol that signifies press Enter
IMPORTANT: Names of the macro commands should always be preceded by \ or / symbol.