Specifying a Room Name
Home > 22 Area > Specifying a Room Name
Specifying a Room Name
Identify the rooms and place the room names in your model.
\roomname
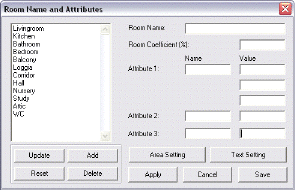
You place room names using the room name and attributes dialog box that contains a list of preset room names, with options to update room names and add new ones.
You can assign up to two attributes each consisting of a name and value. There is also an option to specify the coefficient attribute as a percentage value.

room name
Select the room name from the list, which can be edited (see update and add).
attributes
Assign up to two attributes with name and value. These editable attributes are displayed in a report intended for use with external quantity calculation programs. (Certain countries have Standards Institutes that set attribute codes for specific rooms.) For example, you can set "floor" as the attribute name and "carpet" as the value; or "wall" and "painted". See Queries, Non-geometric attributes for a detailed explanation.
room coefficient
You can add coefficients for the calculation of each room by specifying the coefficient as an attribute when defining the room name (to comply with specific standards in some countries).
 IMPORTANT You must choose the area by coefficient option in the Set Area/Subarea dialog box (described below) for the coefficients to be calculated. You can apply coefficients only to rooms with names.
apply
Close the dialog box. The system prompts you to indicate the room to apply the room name settings.
Adding and Editing Room Names
update —
Click on a name in the list to display it in the room name field for editing and then choose the update button.
add —
Add a new room name by typing it or changing an existing one in the room name field and then selecting the add button.
delete —
Remove name and associated attributes from list.
reset —
Without accepting new settings, restarts set names and values.
save —
Save changes to room names and attributes, which allows you to close the dialog box without applying the modifications immediately. You can do this later. Changes are saved in the roomname.def directory of the system.
area setting
Open the area calculation settings dialog box to change the default settings (see below).
text setting
Room names use the current text settings. Open the text attributes dialog box to change the current settings (see Setting attributes \atext).
cancel
Close the dialog box and ignore all changes.

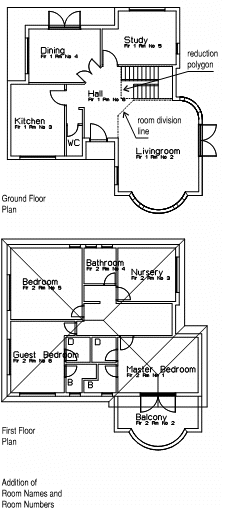
Specify a location point in the model, or press Enter to define text direction by two points. Confirm the room polygon, or indicate manually wall by wall, if necessary. It is sufficient to indicate each wall once even when the wall contains openings. However, if the wall is composed of more than one continuous segment, you have to indicate each segment. Other entities, such as arcs and placed entities can serve to define a space and also require manual indication.
The Room Name dialog box appears. After selecting a room name and defining attributes, choose the Apply button. The text displays in the model.
For the purposes of calculating, room naming is optional if room numbering is used, since either command identifies the room. Similarly, room numbering is optional when room names have been assigned.
 IMPORTANT Make sure that all the entities and elements for calculating are at the same z level. This should be the z level of the wall base at which the cursor remains when using the room and floor identification commands, including Room naming, Room numbering and Floor identification.
Changing a Room Name
To assign a new room name, indicate the room in your model. Select the new name in the Room Name dialog box and choose Apply. The system will ask you to confirm the replacement.