Resize
Home > 25 Raster Support > Resize
Resize
This command enables you to resize an image by modifying its resolution and proportions.
\imgedit resize@
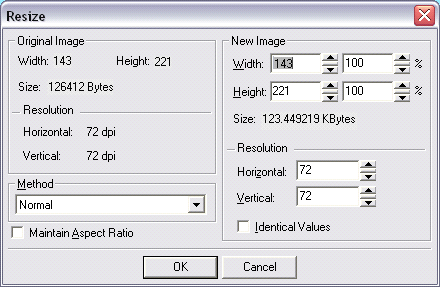
The system asks you to indicate the image to be modified. You can change the proportions and resolution of the image using the Resize dialog box that is displayed:

The left part of the dialog box, entitled Original Image, shows the current size settings: Width, height, size in bytes and resolution (horizontal and vertical) in DPI (Dots Per Inch. 1 inch = 2.54 mm).
The Method range enables you to choose an interpolation method. Normal, resampling or bicubic. The interpolation methods are used to recalculate the increase or decrease in the number of pixels after changing the size of the image:
Select the "Normal" method (default setting) for quick though less accurate results. ARC+ recalculates the position and color of the added pixels (in case of increase in size) or deletes the unnecessary pixels (in case of decrease in size) according to a linear interpolation formula. This method does not consider the pixels located near the recalculated pixels.
Select the "Bicubic" method for more accurate results. This interpolation method helps save more information after changing the size. The addition/deletion of pixels is calculated according to a formula that takes into account the color of 9 pixels close to the recalculated pixels to reduce the pixelization effects.
Select the "Resampling" method for extremely accurate results. The addition/deletion of pixels is calculated according to a method that takes into account the color of 16 pixels close to the recalculated pixels. This method is recommended only while changing the size of small images that have to be enlarged with minimal loss of data. Avoid using this method for big images (for e.g. orthographies) as it may increase the time taken to complete the action.
When you check the Match Aspect Ratio option, the resolution and size of the new image become interlinked. This option helps facilitate your work thanks to automatic resizing.
The right part of the dialog box entitled New Image, helps you change the size and resolution of the image:
You can change the width and height of the image by entering a numerical value (expressed in pixels) or by entering a percentage. You can also modify these values by using the buttons.
You can modify the resolution of the image by entering a new value in Dots Per Inch (DPI) in the Horizontal / Vertical ranges or by using the buttons.
When you activate the "Identical Values" option, the proportions of the image remain unchanged despite the modification of the horizontal and vertical values. Naturally, a change in the resolution can have an effect on the width and height of the image.
Click Ok to apply the modification or click Cancel to cancel the modification and exit the dialog box. When you click OK the existing frame is replaced by a new frame containing the proportions of the new image.
