Remap Hue
Home > 25 Raster Support > Remap Hue
Remap Hue
This command enables you to directly remap the hue, saturation or the value of an image according to the HSB color space configuration.
\imgedit Remaphue@
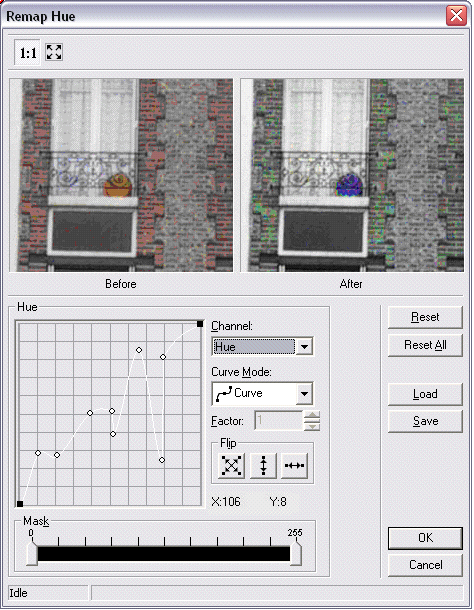
The system asks you to indicate an image to be modified. After you confirm your choice of image, ARC+ opens a dialog box that helps you control and view the modification:

This dialog box contains two "Before-After" windows for a dynamic preview of the modification.
The button enables you to view the entire image; the
 button enables you to view a detail of the image in actual pixel size.
The graph in the Hue section of the dialog box enables you to apply changes to the image by dragging. There are several ways to manipulate the Hue curve:
- Moving the ends of the graph (small black squares - )
)
- Adding a new vertex by clicking the left mouse button ( ).
).
- Deleting a vertex by right clicking near an existing vertex.
- moving a vertex by clicking on it (the vertex becomes blue) and by "dragging" it to a new location.
 NOTE: This is only valid for the Curve and Linear modes.
The Channel selector enables you to modify each of the HSB channels separately:
- The Hue channel enables you to modify the image hues.
- The Saturation channel enables you to saturate or desaturate the image.
- The Value channel enables you to modify the image brightness.
all the modifications are cumulative. You can modify the saturation and then the hue and/or the value without losing the effect of the first change (unlike the modification of the RGB channel to Remap Intensity).
You can define the curve mode using the Curve Mode selector:
1. - is the default mode. This mode enables you to add vertexes and get more accurate results of modification.
2. - enables you to add vertexes but the result is less accurate (though faster) than the one obtained with Curve Mode.
3. - enables you to modify the hue exponentially. When you set this mode, the Factor range is automatically activated; it enables you to enter values between -100 and 100. You can also use the
 buttons to modify values.
4. - enables you to increase the brightness alone. When you set this mode, the Factor range is automatically activated; it enables you to enter values between -100 and 100. You can also use the
 buttons to modify values.
The Flip section enables you to reverse a modification made using the graph. This option is only valid in Curve and Linear modes. There are three reversion options:
1. Reverse in two directions: the graph is reversed horizontally and vertically.
2. Reverse vertically: the graph is vertically reversed.
3. Reverse horizontally: the graph is horizontally reversed.
The modifications of the HSB channels are applied as a mask to the image on which you work. The Mask potentiometer enables you to decrease or increase the opacity of the modification (values between 0 and 255). For example, when the saturation of a colored image is reduced, a part of or all the color information is deleted; a reduced opacity of the mask of the Saturation channel helps you keep more color information and vice versa.
 - this button restores the original status of the curve and cancels the applied reversions.
 - this button restores the default settings (the Curve option in the Curve Mode menu) and cancels the applied reversions.
 this button enables you to save a modification (a graph) as an .lri file. the file can then be loaded to apply the same modification to other images.
 this button enables you to load a modification (graph) saved earlier to apply it to an image of your choice. The loaded files are in the .lri format.
Click Ok to modify the image or click Cancel to cancel the modification and exit the dialog box.
Before applying the modification, the system asks you to indicate a modification setting: apply the change only to the selected image (frame) or to the indicated image (frame) and all its copies.
