Object Manager
Home > 15 Placed Objects and Libraries > Object Manager
Object Manager
The object manager enables you to manage, verify and correct problems regarding the location of source files of placed objects.
\objmng
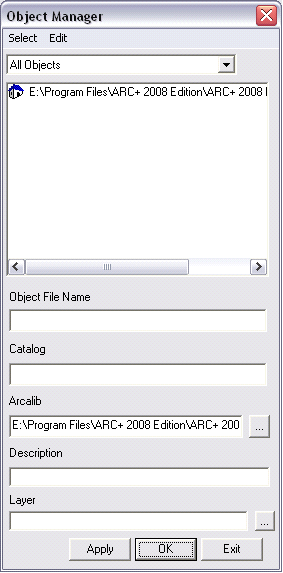
The following dialog box will appear:

This dialog box enables you to :
View all placed objects in the model with the help of a tree diagram.
Verify the number of occurrences of an object by referring to the indication in brackets that appears to the right of the name of each object group.
Filter the objects to be viewed using the pull-down list at the top from which you can choose to display: All objects, Only Correct Objects, Only Missing Objects, or Only Ambiguous Objects.
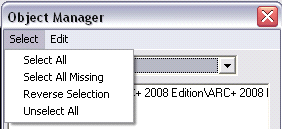
Manage a selection of objects using the options in the new Select pull-down menu or directly with the mouse.
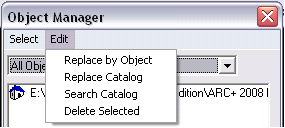
Replace the selected objects in the tree by choosing the Replace by Object or Replace Library option in the Edit pull-down menu
Delete the selected objects in the tree using the Delete Selected option in the Edit pull-down menu
View and change the current ARCALIB path to define the location of libraries.
Change the placing layer, color, line type and width of the selected objects in the tree.
Verify the description of objects.
Verify the path of the source file of the objects.
Object Presentation Tree
This new object manager displays a tree of the objects of your model. Every object in the tree appears with an icon corresponding to its status before its name. The content of each object is analyzed recursively to make a list of all the sub-objects that it contains. All objects with the same name from the same folder are contained in a common folder with the name of this object in front of which you can read in brackets, the number of occurrences in all the insertion levels.
Object Status
For every object, the manager verifies that the corresponding source file is found at the location saved during its placing or if the 2D/3D object is complete. According to the result, the manager assigns its corresponding status.
You can filter objects that appear in the tree diagram so as to only display those that correspond to one of the following status using the pull-down list located above the dialog box:
All Objects: Displays all objects of the model irrespective of their status.
Correct objects: These are objects for which the source file is found at the specified location, or they are 2D/3D full objects.
Missing Objects: These are objects for which the source file is not found at the specified (library) location.
Corrupt Objects: These are 2D/3D objects originally created following the regular procedure of 2 files divided in two directories 2D and3D, but for which one of the required representations is missing.
Ambiguous Objects: These are objects for which the source file is not found at the specified location, but for which there is a file with the same name in the current working directory and which has been used to display them on screen.
Icons used
The tree diagram uses the following icons:
|
ICON |
DESCRIPTION |
|
|
|
This icon appears only at the top of the tree. It represents the current model and is followed by the full path of the current file. |
|
|
|
This icon represents a group of objects with the same name. To the left of this icon appears a [+] or a [–] enabling you to open or close the group of objects to display all their occurrences. |
|
|
|
This icon represents a correct object that is not from ARCALIB. |
These icons are followed by the object name. If the object itself contains a sub-object, a [+] or a [–] appears to the left of this icon enabling you to open or close the object to display all the sub-objects that it contains. |
|
|
This icon represents a correct object from ARCALIB. |
|
|
|
This icon represents a missing object. |
|
|
|
This icon represents a corrupt 2D/3D object. |
|
|
|
This icon represents an ambiguous object. |
|
"Select" Pull-down Menu
This pull-down menu helps you to select or deselect objects in your manager:

Select All – Selects all objects visible in the tree
Select all Missing Objects - Selects only missing objects(indicated by the icon)
icon)
Invert Selection – Inverts your last selection. If nothing is selected this will select all objects in the tree.
Deselect All – Removes any selection currently present in the tree.
 NOTE: You can use the mouse to select objects directly in the list and, add other objects to the selection by keeping CTRL and Shift pressed. The objects selected in the list are highlighted in the model. The selection of the name of the group of objects is recursive.
"Edit" Pull-down Menu
The Edit pull-down menu enables you to manage the selected placed objects in your tree (whether they are missing or not):

Replace by Object – Replaces the selected object(s) in the tree by another object. (see details on following page)
Replace Library – Enables you to replace the current library of the selected object(s) by another library (a new location).
Search Library – Searches selected missing object in a series of possible locations on your operating system (see details below)
Delete Selected – Deletes all the selected objects (activated by the Apply button).
 NOTE: The options of the Edit pull-down menu apply only to the selection.
The file name is separated from the library name - they can be changed separately by choosing the replace by object and replace library options for the file name and library name respectively.
Replace by Object
Whether correct, missing, corrupt or ambiguous, the placed object manager enables you to replace any object. For this, proceed as follows
Preferably, move the dialog box to the side of the screen. Click on the object or group of objects to be replaced in the tree. You can see that the corresponding object(s) are temporarily displayed highlighted in the model.
Click the Replace by Object option in the Edit pull-down menu
In the dialog box that is displayed, browse the directory of the original library of this object to look for a new replacing object, then click OK.
From this moment, the objects concerned are not yet replaced, but in the tree they appear preceded by the following icon:

Click Apply.
Click OK to close the dialog box.
 IMPORTANT: Exiting the dialog box by clicking "Cancel" does not cancel the previous object replacements. To do this, use the standard Cancel command (Ctrl+Z) outside this dialog box. However, it is important to remember that the object replacements can be cancelled only at the current model level. A replacement of an object nested in another cannot be cancelled.
Replace Library
To replace the current library of the selected object(s) by another library proceed as follows:
Preferably, move the dialog box to the side of the screen. In the tree, click on the object or the group of objects whose library you want to replace. You can see that the corresponding object(s) are temporarily displayed highlighted in the model.
Click the Replace Library option in the Edit pull-down menu.
In the dialog box that displays, browse the directories to look for a new library, then click OK.
Click Apply.
Click OK to close the dialog box.
 IMPORTANT: If the new library does not contain an object with the same name as the selected object, the operation for this specific object will be ignored. This option works only for the libraries of the same type (2D/3D or Simple) - the 2D/3D libraries cannot replace a simple library.
Search Library
This new automatic search option of the object libraries enables you to resolve the frequent problem of "missing objects" when opening files from an external source.
To carry out an automatic search for missing objects, proceed as follows:
Preferably, move the dialog box to the side of the screen. In the tree, select the missing objects for which you want to carry out this library search.
Click the Replace Library option in the Edit pull-down menu
ARC+ browses all the folders of your system to look for files of the selected objects.
The automatic search order is:
All folders under "current ARCALIB"
Current WORKING folder and all sub-folders
All folders in "my documents"
 NOTE: If this action takes a long time, you can stop it by clicking in the box that is displayed during the process.
Delete Selected
To delete an object selection of your model, proceed as follows:
Preferably, move the dialog box to the side of the screen. In the tree, click on an object, several objects or a group of objects to be deleted. You can see that the corresponding object(s) are temporarily displayed highlighted in the model.
Click the Delete Selected option in the Edit pull-down menu.
From this moment, the objects concerned are not yet deleted, but in the tree these appear preceded by the following icon:

Click Apply.
Click OK to close the dialog box.
 IMPORTANT: Exiting the dialog box by clicking on "Cancel" does not cancel the previous object deletion. To do this, use the standard "Cancel" command (Ctrl+Z) outside this dialog box. However, it is important to remember that object deletion can be cancelled only at the current model level. Deletion of an object nested in another cannot be cancelled.
Changing the ARCALIB path
You can directly access the \arcalib command (using the button), to define a new library path. For more details on the \arcalib command see page 15-34 Volume II.
 IMPORTANT: After changing the ARCALIB general library path the status of the objects is verified and their status can change (For example: the object can be missing, ambiguous or corrupt in the new location.)
Changing properties of an object
With the help of the object manager, you can change the placing layer of the objects or temporarily assign them display properties like the color, the line type and line width.
 IMPORTANT: Changing the object display properties does not in any way affect the entities contained inside the objects. These properties operate as overlay information that is mainly considered by the system to display objects. You can thus restore the original aspect of the objects by deleting these properties at any time.
To change the properties of an object, proceed as follows:
Preferably, move the dialog box to the side of the screen. In the tree, click on the object or the group of objects whose properties you want to change. You can see that the corresponding object(s) are temporarily displayed highlighted in the model.
Changing the placing layer
Click the icon in front of the Layer field.
Click on the desired layer in the layer selector that appears.
 NOTE: If the layer that you want does not appear in the layer manager, you can add it here by clicking on the icon:
Click Apply.
 NOTE: These changes work only on a single group or an object.
 IMPORTANT: Exiting the dialog box by clicking "Cancel" does not cancel the previous changes in object properties. To do this, use the standard "Cancel" command (Ctrl+Z) outside this dialog box.However, it is important to remember that the changes of the object properties can be cancelled only at the current model level. Changes in the properties of an object nested in another cannot be cancelled.


