Insert Image
Home > 25 Raster Support > Insert Image
Insert Image
This command enables you to insert an image in the ARC+ work area.
\imgplace
When you insert an image in ARC+, it is saved only once in the database. After you activate this command, ARC+ performs two actions:
Embedding the raster image in the ARC+ database.
Displaying image as frame with size and proportions
as specified by the user.
A model can contain a large number of frames of the same raster image, but the raster information is copied only once. Moreover, the same model can contain several frames of the same raster image, each edited or modified with a different effect while the original image that you embedded in the database remains unchanged (see the Image Manager section for more details).
Actually, all the images inserted in an ARC+ model are embedded in the model. This unique insertion method enables you to:
Restore the original state of the image at any time.
Save all images that you work on even inside the ARC+ model and thus avoid any loss of data. The images become an ARC+ element like any other, embedded in the .iii and .ddd files.
The images will be displayed inside the ARC+ model even if they have been deleted or removed from their original location on your disk - provided that you have not deleted them from your model using the Image Manager (see the Image Manager section for more details).
 NOTE: To facilitate understanding of this document, the term "frame" is often replaced by "image ".
After you run the Insert Image command:
Indicate the insertion method to the system – Proportional Bitmap or Free Bitmap. The Proportional Bitmap option enables you to keep the original proportions of the image while the Free Bitmap option enables you to define its proportions dynamically.
ARC+ gives you a choice between 3 insertion configurations :
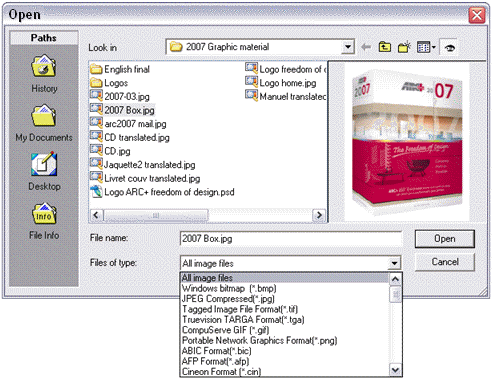
Place Image from File: this option opens the Open dialog box, which enables you to specify the image you want to integrate. ARC+ enables you to open 44 different graphic formats (jpg, png, tiff, psd…). The system displays a list of images available on your computer for quick viewing.

 NOTE: The image size and resolution can affect the time taken to complete the action.
Place Image from List: this option opens the Image Manager (see the Image Manager section for more details), which enables you to select an image that has already been embedded in the current model, provided that the model contains at least one embedded image.
 NOTE: this option is recommended to insert images that have been removed from the model without having been deleted from the database or to add a frame to an existing image.
Place Image from Sample: this option enables you to select an embedded image from your model as sample.
The system asks you to specify the image frame by indicating a rectangle by two points. After inserting the image, you can continue inserting additional frames of the same image by two points, click Enter to access other insertion options or click Escape to exit the command.
