Creating a Wall
Home > 05 Walls > Creating a Wall
Creating a Wall
Create a wall by two points.
\mwall
Define the first point and subsequent points. The currently set wall is created between the specified points. When you create 2D and 3D walls you can join the last wall to the first one you drew—simply press Enter to form the corner automatically.
 HINT Use a help line through the first point if you want to close the wall exactly perpendicular to that point.
If you didn't set a current wall, the system transfers you to the Setting the current wall type (\setmw) command. Choose a wall and then the system transfers you back to creating the wall. Alternatively, you can sample an existing wall to set the wall type of the wall you are currently creating.
After defining the first point the wall is stretched along the guide line. The guide line is the elastic line connecting the first point and the current position of the cursor. At this stage you can do the following:
Change the symmetry of the wall
Change the alignment of the wall
Changing the Symmetry of a Wall during Creation
Change the symmetry of the wall about its current alignment (the guide line), before you define the next point, by pressing Alt+1.
This turns the wall inside out. Press Alt+1 again to reverse the symmetry . The default alignment is the axis of the wall, if an axis has been defined, and the first wall layer if an axis was not defined.
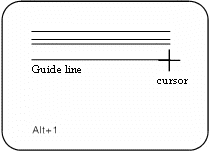
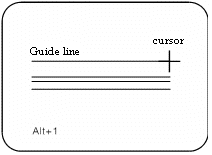
 NOTE You can also update the symmetry of existing walls. See Changing the symmetry of a wall or arc (\mwsym) or Changing the symmetry of a wall together with its openings and T-junctions (\uwsym).
Changing the Alignment of the Wall During Creation
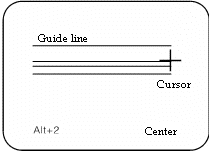
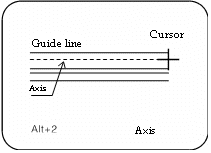
Change the alignment of the wall (relative to the guide line), before you define the next point, by pressing Alt+2.
There are four possible alignments:
Along the axis (if an axis has been defined)
Along the first line of the wall
Along the last line of the wall
Along the center of the wall
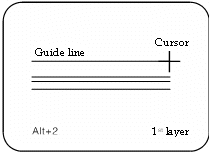
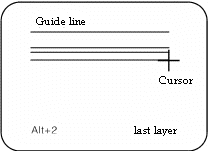
Each time you press Alt+2 the alignment changes to the next type.
To change the alignment of an existing wall see Changing the alignment of existing walls (\ualgn).
 NOTE If you have used the Creating a line at an offset (\oflin) command prior to this command, you must redefine the wall with the setting the current wall type (\setmw) command and then the Creating a wall by offset (\ofset) command.
