Clearing Overlapping Lines
Home > 09 Editing and Manipulation > Clearing Overlapping Lines
Clearing Overlapping Lines
Use this command to clean overlapping lines from 2D drawings. By using this command, you will produce a smaller file and also avoid redrawing an overlapping line several times when plotting.
\cline
 IMPORTANT The command is intended for use on 2D drawings projected on the XY plane.
Lines are cleaned according to the following priorities:
Thin lines are erased leaving thick lines
Dashed and dotted lines are erased according to their number
Colored lines are erased according to their number
For example, where lines type 3 and 5 are coincidental, line type 3 is saved and line type 5 is erased.
 NOTE To use the default settings enter the name of your output file without pressing Enter for advanced settings.
Advanced Options for Clearing Coincidental Lines
Advanced options have been added to enable you to fine tune the system tolerances. These tolerances enable you to determine whether a line will be cleaned (shortened or erased).
 HINT Use the advanced options on models that involve either very large or very small scales.
To fine tune the settings
Choose Enter for advanced settings to define the conditions for clearing overlapping lines:
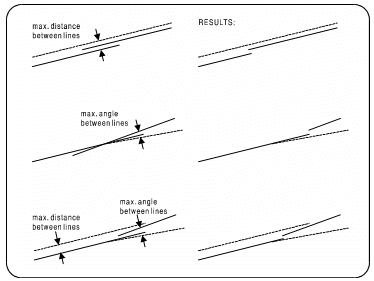
Define the maximum angle created by two lines.
If the angle is less than this value and the other conditions are met, the line is cleaned.

Define the maximum distance allowed between two lines.
If the distance between the two lines is less than this value and the other conditions are met, the line is cleaned.
Define the minimum line length to calculate for cleaning.
Overlapping lines that are greater than this value and meet the other conditions are cleaned.
Enter a filename to save the file.
Overlapping lines that meet all the conditions are erased. The overlapping line or segment is erased or truncated without generating new lines. This ensures that all lines remain in their original position.
Previously, overlapping lines were cleaned after using the Saving a 2D projection of the model (\save2D) command. Now you may operate the command in the modeling mode during any stage of the design process.
