- Start the demo by:
Selecting "Start" > "Programs" >
"LEADTOOLS Document Imaging Suite 14.5" >
"Raster" > "Document" > "Document Imaging
" > "API" and click on the desired demo, as shown
below. (Please note that your exact path may vary, depending on the
toolkit you have installed.)
- or -
Double clicking on the RGSMRK.exe file in the LEAD/BIN directory, where
LEAD represents the directory in which you installed the LEADTOOLS
toolkit. (If you used the default settings when you installed the
toolkit, that path would be "C:\Program Files\LEAD Technologies,
Inc\LEADTOOLS\Bin".)
The steps of using the registration marks
detection functions are:
- Select the reference
document or image (we will refer to it as REF). REF will be considered
as a reference to which we will compare the other documents in order to
detect any shift, rotation, or scaling of the scanned documents. REF is
used to determine the shape of the registration marks (T-shaped in this
version), their number (three in this version) and where they are in the
document. The reference document must be a black and white document
bitmap (black background and white text) containing at least three
registration marks (T shape). In the demo we have included a RGSRef.cmp
file for use as this reference. In the main window of the Registration
Marks Demo, select File > Open.
- In the Open File
dialog, you can either set the path to the LEAD/Images directory in the
"File name" edit box or browse to this directory using the
"Look in" drop box. (Please note that in the LEAD/Images
directory mentioned above, "LEAD" represents the directory in
which you installed the LEADTOOLS toolkit.) Select the RGSRef.cmp file
and click Open.
Scan or open REF.
- From within the REF
file, indicate the locations of the registration marks by doing the
following:
In the main window of the demo, select Image >
New Reference Data. The Select Reference Data dialog will appear, as shown in
the following figure:
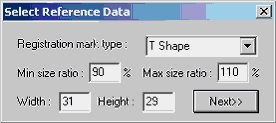
Currently there is one Registration mark type
available, the T Shape. Enter the smallest size you think the registration
mark could be reduced to, in percent, in the “Min size ratio” text edit box.
Enter the largest size you think the registration mark could be zoomed to, in
percent, in the “Max size ratio” text edit box. Enter the width of the
registration mark, in pixels, in the “Width” text edit box. Enter the height
of the registration mark, in pixels, in the “Height” text edit box. Click the
Next button. The Registration Marks dialog will appear, as shown in the
following figure:
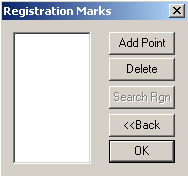
Click the Add Point button, and select three
registration marks on the image by clicking on them. When you click on a
point, its coordinates will appear in the list, and the Search Rgn button
becomes available. You can delete a point by selecting its coordinates in the
list and then clicking the Delete button.
For each point, select a search region around
each registration mark to designate where on the document the registration
marks may appear after an acceptable rotation, shifting or scaling. With a
point selected in the list, click the Search Rgn button and use the mouse to
rubberband an area by clicking the left mouse button at one corner of the
rectangle of the desired area and holding the button down while dragging the
mouse pointer down to the opposite diagonal corner, and releasing the left
mouse button. The selection of regions is important: small regions make the
detection process faster, but run the risk the mark will not be detected
because of shift, rotation or scaling. After you select an area around the
registration mark, an asterisk (‘*’) appears before the point in the list. If
you forget where a point is, click on it in the list and look on the image
for a cross. Click OK when you are done. You can now detect the Registration
marks on a new document.
- In the main window of
the Registration Marks Demo, select File > Open. Open a scanned
document file. In the demo we have included a RGSTest.cmp file for use
as a scanned image. Select the RGSTest.cmp file and click Open.
- Select Image >
Detect Registration Marks. If all registration marks are detected, the
“Success” message appears and the Transform Param option on the Image
menu enables. If the “Error” message appears, usually the problem is
that either there is something wrong with the image (it is not the
correct form, or was incorrectly oriented when scanned in or there was a
misfeed and the image is incomplete or deformed) or the search areas
around the registration marks were not large enough. See the note on
Verification of Reference Data.
- If the “Success”
message appears select OK to close the message box and then in the main
window select Image > Get Transformation Parameters. Another
“Success” message appears, displaying the parameters needed (rotation,
scaling and translation values) to properly transform the scanned image.
These results must be divided by 100 to get the actual values.
- Click OK to close this
message box, and the Apply Transformation option on the Image menu
enables. To correct the image, select Image > Apply Transformations.
Note: Verification of Reference Data. You can
verify that you have performed these steps correctly by following steps 5
through 8 using the RGSRef.cmp file instead of the RGSTest.cmp file. All
marks should be detected with zero variations.
After completing steps 1 –4 you can save the
results to use them later without re-obtaining the reference data. To save
the reference data, select Reference Data > Save. The data is stored in the
file RefData.txt, in the same directory as the demo. To use stored reference
data, select the Reference Data > Load. menu item, then work on the new
documents.
|