Use of ARC+ Manager
Home > 01 Getting Started > Use of ARC+ Manager
Use of ARC+ Manager
Using ARC+ manager, you can toggle between various ARC+ versions or builds. For example, you can install ARC+2009 and ARC+ 2011 in French. on your computer. Using ARC+ manager, you can select which version you want to work on.
IMPORTANT: Your Aladdin protection key should be configured to work on various versions of ARC+. For example, if you have worked on ARC+ 2009 Edition and while upgrading it to ARC+, you have exchanged the protection key you must ask your distributor to provide all the activation codes for all the versions that you want to use.
During the installation, Desktop shortcut option is checked. ARC+ installer will place a shortcut of ARC+ manager on your desktop:

Double click on this icon to open the ARC+ manager:

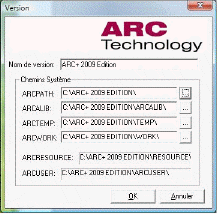
If you have just installed an ARC+ version, the manager will find this version automatically and add to the list. If you have already installed the versions on your system, you can click on to add this ARC+ version in the manager. Following dialogue box will appear:
Click on the button at the right of ARCPATH field. Point the cursor on the location of the ARC+ installation folder:
Verify that the folder is "open" () then click OK
Version name field - enter the ARC+ version name that you want to be displayed in the manager (For example: ARC+ 2011 Build 555), or keep the proposed name, it is same as the name of the selected ARCPATH folder.
The sub-folders of installation of the selected version will be displayed automatically in all other fields of System paths :
For ARCALIB (library of placed objects), ARCTEMP (folder containing temporary files created while working on ARC+) and ARCWORK (working folder for starting the session) – you can give other folder paths. However, you cannot modify the paths and location folders of: ARCRESOURCE (location of ARC+ source program) and ARCUSER (location of user settings and preferences).
Click OK
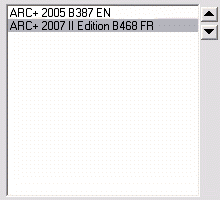
The name of the version that you just added is displayed in the start window:

You can repeat the process given above to add as many versions of ARC+ as you want.
You can click on to edit the paths and folders of a defined version or on to remove it from the list of the manager.
NOTE: "Delete" button cannot uninstall the version; it only removes it from the list of versions available for starting ARC+ directly.
Add manager to the Windows® toolbar
Check the "Add the ARC+ runner to the bar" option, a small icon of ARC+ manager will be added to the normal Windows® toolbar, after closing the manager:

Right click on the ARC+ manager icon to open the contextual menu with various options:

All the ARC+ versions that you have configured in the ARC+ manager will be displayed here in the same order. Select one of these versions to start ARC+ directly. Two other options are given in the list, they are to open or close the manger window.
NOTE: With this new ARC+ Manager, you can start multiple sessions of the same version from the same installation folder. However, it does not allow opening different versions simultaneously.
Start an ARC+ version from the manager
There are two ways to start an ARC+ version from the manager:
Click on to start the selected version or -
Double click on its name in the version start window.
Management of versions installed from the manager
It is possible to manage and process the ARC+ versions installed on your system from the 'ARCPLUS' Manager. Start the contextual menu linked to each version by right-clicking on the version name:

Run update from internet – Starts the update tool of your version that will search the latest update available.
Open ARC updater manager - Starts the ARC+ updater manager (See: Update ARC+ through Web in this chapter)
Uninstall this version – Starts the unins000.exe tool that uninstalls the selected version.
NOTE: Once the selected version is uninstalled, please close the ARC+ manager from the Windows toolbar (right click on the icon and "Close the ARC+ manager"), only then the uninstallation will be taken into account by the manager.
Update the key to use this version – Starts the UPDHASP.EXE tool that lets you enter the new codes for activating an already installed version, as well as to update it or to change its date of expiry.