Using the Roof Openings Dialog Box
Home > 23 Roofs > Using the Roof Openings Dialog Box
Using the Roof Openings Dialog Box
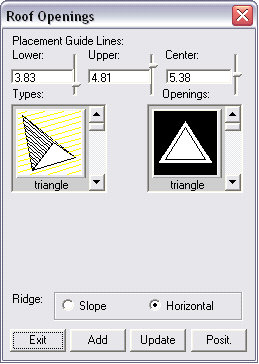
Select and design roof openings and dormer openings from the Roof Openings dialog box.

add Indicate the roof plate on which the opening will be created. You can indicate the polygon perimeter edge or the roof plate.
 NOTE The add button is not required when the dialog box is first invoked.
placement guide lines: Guide lines to help you position the opening.
lower The location of the lower edge of the roof opening (where z = 0).
upper The location of the upper edge of the roof opening when the opening is sloped (where z = 0).
center The location of the roof opening along the length of the roof—vertical.
position The precise location of the center of the roof opening face. Define or snap to a point. The guide line options are disabled.
types Roof opening types, including dormers, chimneys or skylights.
width The width of the lower edge of the roof opening.
height The height of the roof opening.
openings Dormer opening types.
width The width of the lower edge of the dormer opening.
height The height of the dormer opening.
NOTE Additional parameters for roof and dormer openings are available, depending on the roof or dormer type selected.
update The roof opening to be edited.
ridge: Represents the position of the dormer ridge or roof on the roof plate.
horizontal Positions a dormer ridge or roof so that it is horizontal.
slope Positions the dormer ridge or roof at a specified slope.