Preparing the Model for Calculations
Home > 22 Area > Preparing the Model for Calculations
Preparing the Model for Calculations
Initiate the Calculation Mode
You initiate the Calculation mode by choosing the area calculation or quantity commands or by pressing the mode button on the status bar to change the mode from modeling to calculations. The regular side-bar menus change to calculation side-bar menus and a single, enlarged work area is displayed.

When calculating areas, ARC+ adds the following entities to your model.
polygons for areas, perimeters, height and reduction zones.
solids for volumes
subdivision lines (Area calculations only)
wall and opening surface polygons (Quantities only)
text displaying calculation results (optional)
These entities are placed in the layer specified in the area calculation settings (default 100).
Regulate the calculations settings to determine which type of data is included in the reports.
Delete Unnecessary Entities
A normal ARC+ model contains elements that may interfere with the calculations of areas and quantities. Simplify your model before performing these calculations by removing all unnecessary elements.
Only entities that are required for the calculations should be displayed, such as walls, subdivision lines and polygons (for subtraction spaces). All other entities should be deleted or blanked.
The following is a typical (though not the only) method for avoiding unnecessary entities that could interfere with area and quantity calculations.
You can create a separate model for performing the calculations or isolate the required entities in one of the following ways:
Trace the model in a separate layer.
Copy the model and then erase the extraneous items.
Create those entities required for calculations in separate layers and blank all other layers.
Blank (or delete) all entities that are not required.
 NOTE Entities like help lines, text and dimension lines do not affect the calculations.
Room and Floor Identification
Rooms and floors are identified automatically by the system or manually by the user. In order to produce calculations, the system creates room polygons in your model when you name or number rooms, and creates floor polygons with the floor definition command. These options create polygons by which the system identifies the walls of rooms and floors for the purpose of calculations.
To produce calculation results you can rely on the default settings or make adjustments using the area calculation settings dialog box. These tell the system which range of calculations to perform, and which line and text attributes to use. After calculating the report you can view and edit the report results.
Define Rooms

The first step is to identify the specific rooms or areas for calculation. Rooms are defined by walls or polygons. If the system identifies the space with edges other than those that you require, you can opt for manual indication. Even if a room is not fully enclosed, the system prompts you to indicate the room edges and encloses the area with a polygon.
Prepare Walls
Wall Junctions – It is recommended to ensure that all walls are properly connected to each other by corners or T, C or X junctions.
Wall Arcs – Wall arcs can only be joined at their ends. Do not connect walls or space dividing lines to any other point on a wall arc.
Wall Ends – Free wall ends (e.g., adjacent walls have been deleted) within the area to be calculated must be closed using the Closing a wall end (\cmwal) command).
Prepare Floors
Floor slabs (polygons with height) must be blanked or deleted and may not be included for the calculation. Use the specific command to identify a floor—the system automatically generates a polygon around the floor.
In the case of split-level floors, the calculations should be executed separately for each level of the model. Each split level must be delineated by walls or space dividing lines.
Perform Calculations on Several Areas
You can calculate the areas of several buildings, floors or apartments together. Move all the areas for calculating to the calculation layer. For the compiled calculation, assign the same floor and building number to each area.
Exclude Reduction Areas from the Calculation
Define a reduction area (e.g., a stairwell) that is to be subtracted from a calculation area by surrounding it with a reduction polygon. (See Identifying Reduction Areas \reduce). The reduction area must be at the same z-level as the wall base.
Similarly, you must identify as reduction areas the polygons of those placed entities and parametric objects (blocks) that you want to subtract from the calculation.
Roofs and Volumes
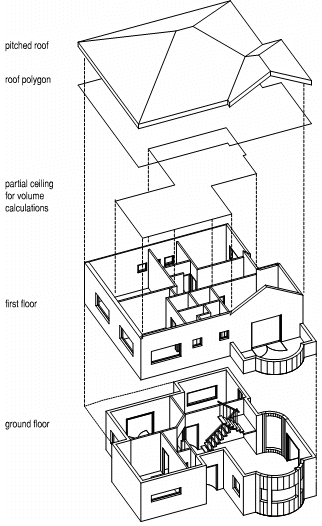
A space must be covered by a closed polygon surface in order to calculate the volume. The polygon can be part of a roof slab solid or a 2D polygon specially created for the calculation.
If a space is not covered entirely by a polygon (e.g., a partially covered balcony or a chimney (hole) in a roof), the volume cannot be calculated. To obtain a volume calculation, create a temporary polygon to cover the entire floor area, or one to fill the hole. Rooms may be covered by ceiling polygons at different heights, but the entire area must be covered to create volume and height zones. Volumes are calculated to the lower side of the ceiling polygon; volumes above that are ignored.
 IMPORTANT A simple solid (prism) with a non-polygon side that is used as the covering, must be converted from a regular to a complex solid using the (\sol3to9) command.
Link a Group of Buildings
You can calculate the area of a group of buildings by linking them with a line using the Dividing a space (\roomdiv) command.
Limitations:
Walls with openings that have been exploded into lines need to be identified manually (edge by edge) in order to perform the calculation.
A large number of arc segments increases the time it takes to perform the calculation for room volumes. By reducing the number of arc segments using the Smoothing the curvature of arcs (\sarc) command you can achieve faster calculation results. On the other hand, accuracy of the measurement is diminished.
Room Inside a Room
In the case of a room within a room, unconnected by walls (e.g., a free-standing reception area in a lobby), you can generate calculations for both areas. You must first identify the inner room (by name or number), then identify the enclosing room. Define the inner room as a reduction area of the outer room and then calculate the report. The area of the enclosing room less the area of the inner room is displayed as the Room area of the external room. The area of the inner room is displayed separately.
