Instructions for Preparing an ARC+ Model for Stereolithography
Home > 26 STL > Instructions for Preparing an ARC+ Model for Stereolithography
Instructions for Preparing an ARC+ Model for Stereolithography .
 IMPORTANT: It is strongly recommended to consult your Stereolithography service provider before even creating your 3D ARC+ model. The instructions given here are only general rules for production.
Before starting with the 3D modeling work in ARC+, set the scale for your model. Even if ARC+ offers the possibility of creating fine details with the scale of 1:1, it is very necessary to know the scale of the final product, as the "real model" must be able to carry at least its own weight. For example, if your model contains a column of 20x20cm and you plan to produce a model with 1:200th, then its size in the model will only be one square millimeter.
Some stereolithography methods like the photopolymerization consist of hardening a liquid by projecting light on it. Thus, the "solid" parts in your volumes are created and the "voids" remain liquid. These liquids need to be removed after the production process to make your model presentable. If your model contains elements that are extremely fine and fragile with respect to its scale, they can be broken while removing the liquid.
Majority of the stereolithography apparatus allows a resolution up to 1:20th of millimeter. Theoretically, you can create very fine elements, but it is strongly recommended to simplify certain fine elements, which may not resist the pressure exerted by spraying.
Follow the instructions given below to ensure that the stereolithography apparatus can produce your 3D ARC+ model perfectly:
Avoid creating detailed projects for the models of a size smaller than 1:100th. If possible, simplify your 3D model for 2D rendering.
Create a pedestal for your model - a board on which the model will be placed.
If you want to show the technical details of your creation - always choose a large scale for creating detailed sections of your model. For example, a several centimeters wide double section scaled at 1:20th, 1:10th, or greater.
Avoid creating isolated objects of small size. Generally, an isolated object of a section of 6mm² and considerable height (2-3cm max.) can resist spraying of model without any particular problem.
Consider the tolerance of the ARC+ model. The tolerance controlled by the /tol command (see page 11- 33) determines the distance between the elements you create. It is necessary to set a sufficiently high tolerance for your models for stereolithography. This can help converting your ARC+ model into forms with adjacent triangular faces, which are in STL format. The purpose is to have minimum "free" elements, which can break while spraying. The ideal case is to have a single triangulated element before production.
It is preferable to omit the complex openings containing 2D or very fine polygons that are supposed to represent the window tiles etc.
Consider the liquid remaining in the void volumes of your models. Remember to remove the liquid if your model has internal parts. It is recommended to create two small holes (for example, by a negative polygon) with a few millimeters diameter, in every void and closed volume to let the liquid out after production. However, it is preferable to avoid this situation by cutting the model on strategic locations. (see following point)
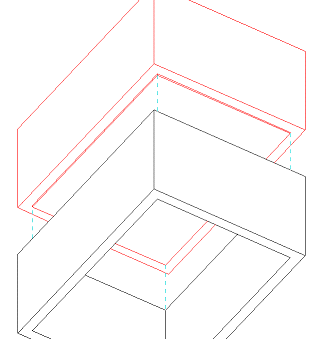
Work by sections and consider creating sockets for the parts of your model. If you are creating a complex edifice with several levels, it is preferable to "cut" it in sections fitting on one another. Create small projections and undercuts, which will allow you to keep a stable model structure.

