Creating a Roof Perimeter
Home > 23 Roofs > Creating a Roof Perimeter
Creating a Roof Perimeter

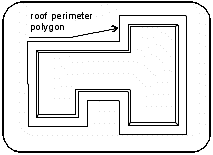
Create a polygon that represents the external perimeter of the roof projected onto a horizontal plane. In this chapter, this polygon is referred to as ‘roof perimeter polygon’.
Create a roof polygon perimeter using the polygon creation commands. You may also use line commands and convert them afterwards to polygons.
HINT: For example, use Line, Creating a line at an offset (\ofline) to create a parallel line around the building. Convert the lines to a polygon, using the Assembling a polygon from a group of lines (\aspol) command.
The offset of the roof perimeter from the wall represents the overhang that is the distance between the roof edge and the wall.
It is not required that the roof perimeter polygon extend beyond the external walls. It may cross the walls where, for example, the gable does not cover the roof.
You may redraw the perimeter or modify it after the roof is generated. See Modifying the roof perimeter.
NOTE: To decrease drawing time if your roof polygon contains arcs, it is recommended to adjust the arc resolution. Use the Smoothing the curvature of arcs (\sarc) command to reduce the number of segments used for displaying arcs. For example, set the resolution as follows:
Size of arc segment in current scale⎯0.2.
Minimum and maximum number of segments in an arc⎯5-10.
Creating Porticos and Other Roofs without Wall Support

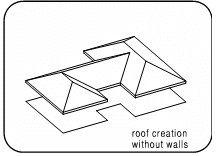
A roof may be created over an area that is not enclosed by walls for designs such as porticos, car ports, etc. To do this, design a roof perimeter polygon and generate the roof using the regular Roof Attributes dialog box features.