Creating a Free Polygon
Home > 04 Polygons and Solids > Creating a Free Polygon
Creating a Free Polygon
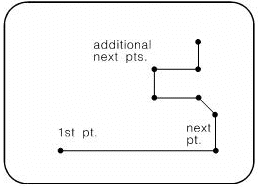
Create a free polygon shape by defining first and subsequent points.
\newp
Define the first and subsequent points. A guideline is stretched between the previous point and the current location of the cursor.
You can start a polygon by an arc, if you wish.
Only a single polygon can be current at a given time. As soon as you call this command the "current polygon" status is initialized.

Polygons may be open or closed loops. Close the polygon (connect the current point to the first point) by pressing Enter during its creation, or by using the Close polygon (\endp) command on a "current polygon".
When closing the polygon, you have the possibility to chose the type of 2D polygon or to continue to expand it to 3D as a prism.
In surfaces viewing mode the surface is displayed in the same color as the polygon contour. If it is changed to a symbol polygon (polyline), it appears as a transparent outline.
 NOTE It is recommended not to change the line attributes (color, type, and thickness) while creating a polygon as this may cause unexpected results in solid viewing modes.
 HINT To make sure that your Surface Polygon is co-planar, you may use the command \proj, in order to project all its points to the same plane.
