Adding Calculation Division Lines
Home > 22 Area > Adding Calculation Division Lines
Adding Calculation Division Lines
Subdivide a space to create calculation areas.
\subdiv
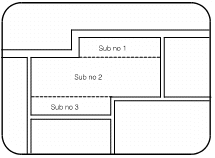
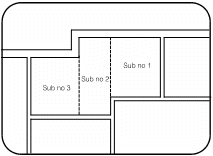
Rooms of irregular shapes are subdivided automatically by the system into rectangles, triangles, trapeze or arc sectors. The subdivisions are optionally labeled and displayed in the output layer according to the definition in the Area calculation settings (\calcset) dialog box.
If you require a different method of subdivision, you can manually divide a space, and the system will generate separate calculations for each subdivided area.
If you add manual subdivision lines and reduction areas to rooms (see the Identifying reduction areas \reduce command) the system will not add any more when you generate the calculation. Therefore, ensure that you have fully subdivided the area into basic rectangles, triangles, etc.
The system automatically places subdivisions parallel to the longer axis of the room. When you subdivide a room manually, add subdivision lines as required, making sure to add all lines that are necessary for the calculation.
To produce Calculation subdivision lines, identify the room to divide. Attach the line to first and second points. A sub-area division line appears with line attributes determined in the settings option. Only rooms that have already been identified by name or number can be subdivided.


After performing the calculations, you can use this command to add to the lines placed by the system.
 IMPORTANT Use B2 button (snap) to ensure proper connections.
 NOTE The line type is specified in the Area calculation settings dialog box and is known as the contour line type.